Formatting Numerical Input with Rails

Often, forms contain numerical fields for large numbers or monetary values.  In such situations, it’s very useful to format these inputs with javascript (adding commas, dollar signs and so on).  While the javascript is easy enough for this, rails does not like receiving commas or dollar signs in numerical fields.

Typically, one has two options to get rails to play nicely with this:

  1. To add a workaround in the model to scrub out unacceptable characters.
  2. To modify the submit button behavior to use javascript to scrub out those characters immediately prior to form submission.

Each of these strikes has always struck me as a bit cumbersome and intelligent.  Surely this operation is common enough that a plugin of sorts must exist to handle this.  …right?…….

Well I’m glad to tell you that after much searching, I’ve found a gem that does the trick.  It’s called autonumeric-rails and it can be found on github or on rubygems.org.  The Gem uses the autoNumeric jquery plugin to format a numerical input with commas, dollar signs or whatever else you might want.

Here’s how it works:

On top of the jquery plugin it makes the input agreeable with rails by creating a pair of inputs for each field: one visible, one invisible.  The visible one is formatted using the standard jquery plugin, but the invisible one only contains the numerical value of the formatted visible field.  Therefore, upon submitting a form, only the invisible, unformatted field is submitted.

So how do i use it?

Implementing the gem is very simple and it can be used with most of the options from the autoNumeric jquery plugin.  Here’s how:

1.  Add the plugin to your Gemfile and “bundle install”

2.  Make sure that Jquery is “required” in your app and add autonumeric’s javascript file

//= require jquery
//= require autonumeric

3.  Add the necessary data attribute to your input field.

This is where the autoNumeric jquery plugin site comes in handy, which has an interactive interface for building the appropriate data attribute based on your needs.  Here are a couple examples.

<%= form_for @model do |f| %>
<%= f.text_field :decimal, label: "Just a number with commas and 2 decimal places", data: {autonumeric: true} %>
<%= f.text_field :dollaz, label: "Standard monitary input", data: {autonumeric: {aSign: '$ ', mDec: 2}} %>
<%= f.text_field :integer, label: "Just an integer with commas", data: {autonumeric: {mDec: 0}} %>
<%= f.text_field :posInt, label: "Positive integer with commas", data: {autonumeric: {vMin: 0}} %>
<%= f.text_field :posDec, label: "Positive decimal with commas and two decimal places", data: {autonumeric: {vMin: 0.00}} %>
<% end %>

4.  That’s it, enjoy!


…But wait is it?  Not quite, if you’re adding fields dynamically

Sometimes we want to add fields dynamically (once the page is already loaded).  Many rails developers use the favorite cocoon gem for such a situation.  The autoNumeric gem needs to be refreshed upon the addition of any fields in order for them to be formatted accordingly.  It should also be pointed out that we must use the GEM’S javascript calls and not those of the jQuery plugin.

So for some nested fields in cocoon (as shown below), we add the following javascript.

<div class="nested-fields">
<%= form_for @model do |f| %>
<%= f.text_field :decimal, label: "Just a number with commas and 2 decimal places", data: {autonumeric: true} %>
<%= f.text_field :dollaz, label: "Standard monitary input", data: {autonumeric: {aSign: '$ ', mDec: 2}} %>
<%= f.text_field :integer, label: "Just an integer with commas", data: {autonumeric: {mDec: 0}} %>
<%= f.text_field :posInt, label: "Positive integer with commas", data: {autonumeric: {vMin: 0}} %>
<%= f.text_field :posDec, label: "Positive decimal with commas and two decimal places", data: {autonumeric: {vMin: 0.00}} %>
<% end %>
</div>
$('div#dynamic').on('cocoon:after-insert', function(e, insertedItem) {
$(document).trigger('refresh_autonumeric');
});
view raw additionaljs.js hosted with ❤ by GitHub

Now you’re actually done.  Happy coding!


Formatting Numerical Input with Rails

Kubuntu 16.04 GUI Audio Controls not working


I just upgraded to Kubuntu 16.04 beta and ran into a frustrating situation. My audio controls weren’t working; I tried my volume buttons, mute button and the little icon at the bottom (which happened to be highlighted in red).

RedIcon

When I went into Audio Volume Settings, all tabs had their own little version of “No _____ Detected”

nodetected

So what to do?

After some troubleshooting with the fantastic help of “clivejo” in the #kubuntu freenode channel, it was finally determined that the settings that I carried over from my previous version of Kubuntu were causing the problem.  Here’s how I solved it:

  1. Remove directory ~/.config/.pulse/
  2. Remove directory ~/.configh/.kmixrc
  3. Do this for all user accounts that have been carried over (these configurations are user-specific)
  4. If the issue persists, reinstall pulseaudio: sudo apt-get install --reinstall pulseaudio

With these four steps, you should regain control over your life again (or at least your audio).

Update:

You may find that the above temporarily solves the problem but upon the next bootup, it’s the same issue all over again.  (That was the case with me.)  Apparently there was another file somewhere in ~/.config/ left over from 14.04 that was screwing everything up.  (Seemed it clashed with Plasma’s autologin and pulse audio got pinched in the middle.)  Anyway, I just removed ~/.config/ entirely and started fresh.  If that’s not an option for you, remove each file one by one and see which one’s the culprit.  I just didn’t have the patience for that.

Update part 2:

The files that were causing trouble in my ~/.config/ were:

  1. ~/.config/akonadi/agentsrc
  2. ~/.config/akonadi/akonadiconnectionrc
  3. ~/.config/akonadi/akonadiserverrc


Kubuntu 16.04 GUI Audio Controls not working

Polymorphic Associations The Smart Way: Using Global Ids

Global IDs have previously been a feature of rails with the help of a gem but as of Rails 4.2, it’s officially baked into the platform.  I just recently used the new addition to create polymorphic associations within an app and I have to say, it’s fantastic.  I did, however, find very little help out there for first-time users of this feature so here’s a few notes on how to do it.

What is a global id

Global Id is a library that produce Uniform Resource Identifiers (URIs) for any piece of data you’d like. They tend to look something like this:
gid://name-of-app/Person/1

Global IDs have previously been a feature of rails with the help of a gem but as of Rails 4.2, it’s officially baked into the platform.  I just recently used the new addition to create polymorphic associations within an app and I have to say, it’s fantastic.  I did, however, find very little help out there for first-time users of this feature so here’s a few notes on how to do it.

What is a global id

Global Id is a library that produce Uniform Resource Identifiers (URIs) for any activerecord object. They tend to look something like this:
gid://name-of-app/Person/1

So global IDs allow all of this information to be expressed in a single string very quickly.  With a couple methods in the model we can use this to create a polymorphic association.

Cool, so how do I make this happen?

Let’s pretend that we want to set up an association to indicate whether a Stockholder is a Person or a Company.

First, we need to generate our stockholder model

We will need two columns: entity_id and entity_type. Just like in the standard polymorphic association, the latter stores the model name, the former stores the id within that model.  We can generate both with a single line in our migration as follows:

class CreateStocholders < ActiveRecord::Migration
def change
create_table :optionees do |t|
t.date :grant_date
t.integer :shares_outstanding
t.belongs_to :option, index: true, foreign_key: true
t.references :entity, polymorphic: true, index: true
t.timestamps null: false
end
end
end

Next, we set up our models to indicate a polymorphic relationship

Company Model:
class Company < ActiveRecord::Base
has_many :stockholders, as: :entity
end

Person Model:
class Person < ActiveRecord::Base
has_many :stockholders, as: :entity
end

Stockholder Model:
class Stocholder < ActiveRecord::Base
belongs_to :entity, polymorphic:true
end

In the above case, :entity is just catch-all field that represents people and companies. Of course, you can call yours whatever you’d like.

Now we can set up our form for the stockholder

I use simple_form but the principle is the same for other methods; adjust your syntax accordingly. Something like this.

...
<%= f.grouped_collection_select :entity_id, [Company, Person], :all, :model_name, :to_global_id, :email %>
<%= f.input :issue_date, label: false %>
<%= f.input :shares_issued, label: false %>
...

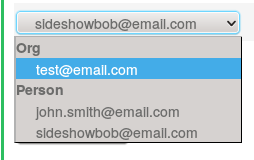
So obviously, the exciting part here is the grouped_collection_select which will render a nice select menu with both companies AND people in it.

To break it down:

  • This is a grouped collection for a client
  • Over the models Company and Person
  • It will use all of the records in each model
  • and group them according to their model_name.
  • It will use the global_id to get the values
  • and display the email of each in the menu

The above will give you a grouped selector similar to the one shown below (note I used Org instead of Company, but you get the idea).
groupedDropdown

But you might rightly ask: “Why did you use email addresses and not names?”  The tricky thing about these sorts of associations is that people have both a first name and a last name where companies just have a name.  In order to get names to render in such a situation, you will need to use a lambda, which I’ll go over at the end of the post.

Making Global Ids work with Polymorphic Associations

If you’ve been keeping track though you should see that we have created two key problems for integrating the global id with polymorphic associations:

  1. We need :entity_type as well as :entity_id
  2. :entity_id needs to be an integer, not a string as is a global id.

So, to rephrase the situation, we need to break the global id into two pieces:

  1. Its model name (a string)
  2. Its id for that model (an integer)

Fortunately we don’t need to do this manually, rails polymorphic associations will store the model name and id automatically if it knows which object to reference.  Therefore, we specify getter/setter methods to specify the object, using global ids.

So, editing the Stockholder model again:

class Stocholder < ActiveRecord::Base
belongs_to :entity, polymorphic:true

def global_entity
self.entity.to_global_id if self.entity.present?
end

def global_entity=(entity)
self.entity=GlobalID::Locator.locate entity
end
end

Then change the grouped_collection_select to:
<%= f.grouped_collection_select :global_entity, [Company, Person], :all, :model_name, :to_global_id, :email %>
<%= f.input :issue_date, label: false %>
<%= f.input :shares_issued, label: false %>

Then just be sure to add :global_entity to your strong params and that’s it!


Using the lambda for names

Ok, often when doing polymorphic associations, one will use different pieces of information as keys for the two different models (after all, they’re not always going to have the same columns, right?)  In such a case, we use a lambda, making our select like this:
<%= f.grouped_collection_select :entity_id, [Company, Person], :all, :model_name, :to_global_id, lambda {|company_or_person_object| company_or_person_object.instance_of? Company? rescue company_or_person_object.fname + " " + company_or_person_object.lname rescue company_or_person_object.name}, label:"Stockholder", class: "names"%>

As an explanation of lambdas is a bit beyond the scope of this tutorial, I’ll just leave you with the example above.  There is plenty of documentation available out there on the matter so if the lambda’s confusing, just google it up.

Anyway, that’s it; you’re done!


Polymorphic Associations The Smart Way: Using Global Ids

Get Firefox to display warning message when exiting multiple tabs

This problem had been a nuisance for me for a while,  In the past, whenever I exited out of a window with lots of tabs, I’d get a nice warning message asking to confirm that I wanted to exit out of all pages.

popup

This was fantastic because, on a qwerty keyboard, Q and W are right next to eachother.  So, one slip of the finger turned a command to close a single tab into a command to close the whole darn window.  But it seems that new versions of  Firefox have disabled this warning by default.  Today, with the help of Mardeg from the #firefox channel on irc.mozilla.org, I re-enabled it!

Here’s how:

  1. Navigate to about:config?filter=browser.showQuitWarning in Firefox.URL
  2. Then you will be confronted with some warning about voiding your warranty (see below)Warning  You really needn’t worry about this for the setting we’re changing.  The warning applies to all navigations to about:config as some settings in there can indeed be precarious to change. This one is not.
  3. Next you will be faced with the setting itself.  setting  Simply double click on it or right click to toggle it as true.
  4. Finally close out of the tab and you’re done!  The next time you exit out of firefox with multiple tabs, you will receive a warning.
Get Firefox to display warning message when exiting multiple tabs

Cheatsheet for viewing commits/branches in git

A couple notes on different log flags that I use for a couple applications

Only shows commits that are referred to by current state of branch
git log --graph --all --decorate --simplify-by-decoration

Shows all commits from all branches in a tree
git log --graph --all --decorate

A few notes on reading a branch.

If you are confronted with something like the following:


* commit 4589a323c3eddc4f488ea856c49db86d76bfe65f (Branch_5)
| Author: Neanderslob <neanderslob@neanderslob.com>
| Date: Tue Apr 14 01:52:17 2015 -0600
|
| Commit 5
|
| * commit d168ac4d7ab7e80c85d0630dc00a67319293f6a7 (Branch_4)
| | Author: Neanderslob <neanderslob@neanderslob.com>
| | Date: Tue Apr 28 15:01:00 2015 -0600
| |
| | Commit 4
| |
| * commit 06a6299ede5a1d6abf562b3a4999d6b6905dae80 (Branch_3/Branch_4)
|/ Author: Neanderslob <neanderslob@neanderslob.com>
| Date: Fri Apr 24 15:24:08 2015 -0600
|
| Commit 3
|
* commit 2118bcb9d2c5fae313841fa66a5af6294cf8ba31 (Branch_2)
| Author: Neanderslob <neanderslob@neanderslob.com>
| Date: Sat Apr 4 02:49:06 2015 -0600
|
| Commit 2
|
* commit 413697b0fbd36552613c51634080b419bf8ed6e9 (Branch_1)
| Author: Neanderslob <neanderslob@neanderslob.com>
| Date: Fri Mar 20 17:24:27 2015 -0600
|
| Commit 1

The way you read it is:

  • Branch_2 comes off of Branch_1.
  • Branch_3 and Branch_4 came off of branch 2 at the same point
    • Branch_4 is ahead of Branch_3
  • Branch_5 came off of Branch_2 as well but after 3&4 did
Cheatsheet for viewing commits/branches in git

Adding a devise user or admin in a Heroku app

To add a devise user on a Heroku site we combine two commands

Command 1: With devise a person can enter the following into their rails console to create a user: User.new(:email => "user@name.com", :password => 'password', :password_confirmation => 'password')

Command 2: To run commands in the Heroku terminal, simply go into local directory of the corresponding app and type heroku run [whatever you want to run]

So if we put those together we get the following, assuming that your user model is in fact called User:

    1. Change your directory to your app: cd ~/yourapp
    2. Enter into the rails console on Heroku with the following: heroku run rails c
    3. Run the create user code: U=User.new(:email => "user@name.com", :password => 'password', :password_confirmation => 'password')
    4. Then finally U.save

Finally, if you want to do this for a separate admin model, simply replace User in the instructions above with Admin (provided of course that’s what your separate admin model is called; if not adjust accordingly).

That’s it! You should be good to go!

Adding a devise user or admin in a Heroku app

Styling Fields Dynamically Added With Cocoon

I recently ran into a situation where I realized that the nice slick J-Query styling that I’d given to my select menus hadn’t carried over to my dynamically added fields.  This is because, my javascript ran $('select').customSelect(); when the page loaded but at no point after. I therefore needed to figure out how to trigger that function once a dynamic field was added.

After quite a bit of searching around (on the order of hours) and several dead ends, I finally learned that cocoon has many different actions that can be used with on() In my case, all I needed was the following:
$('#test').on("cocoon:after-insert", function(e, added_item){
added_item.find('select').customSelect();
});

And I was good to go.

Styling Fields Dynamically Added With Cocoon

A beginners look at RVM: Installs, Upgrades and the rest

One of the most confusing things about learning rails is in dealing with the Ruby Version Manager (RVM). Being a noob myself in the Ruby world, I wanted to give some clarification on stuff that I’d wondered at the outset regarding this tool.

RVM is basically a package manager (like apt for fellow linux users); it upgrades packages, downgrades them, allows you to switch out versions, etc. The big question on my mind was “why doesn’t ruby just use apt!?” Indeed, apt had served me well for php and it seemed to be a needless complication to use some other package manager for this language.  “Why was Ruby so special that it needed its own package manager!?”  I’m still not entirely sure of the rationale behind this, but my guess is that one of the things that makes Ruby so useful is its “Gems” (Rails is one of them), for which Ruby sort of acts as a package manager in itself.  I figure this makes it much more important for users to have a more control over the versions of ruby that they’re using; either way RVM (and a few others like it) are the ways to manage ruby, so here are a few tips to make it work.

Note: These instructions might have an Ubuntu flavor to them here and there, because that’s what I use.  For the most part, they’re universal though.

To install RVM:
\curl -sSL https://get.rvm.io | bash -s stable --ruby

To check the version of ruby:
ruby -v

How can I upgrade to the latest version of ruby!?
There is no way to just upgrade ruby to the latest (whatever it happens to be). RVM seems to be all about giving control to YOU; it’s not going to make the choice for you. Here’s how I go about it.
First, I update my list of known stable ruby versions
rvm get master
Then, I check that updated list with:
rvm list known
My output looked like this:

# MRI Rubies
[ruby-]1.8.6[-p420]
[ruby-]1.8.7[-head] # security released on head
[ruby-]1.9.1[-p431]
[ruby-]1.9.2[-p330]
[ruby-]1.9.3[-p551]
[ruby-]2.0.0[-p598]
[ruby-]2.1.4
[ruby-]2.1[.5]
[ruby-]2.2.0
[ruby-]2.2-head
ruby-head
# for forks use: rvm install ruby-head- --url https://github.com/github/ruby.git --branch 2.1

The real output was actually a lot longer as it gives you ALL the packages you can get with RVM but I cut it off (we’re not interested in JRuby or anything like that).  Anyway, I checked out the list and saw that 2.2.0 was the latest so I entered:
rvm install 2.2.0

Managing installed versions:
RVM also allows a user to have many “Rubies” installed (versions of ruby).  To see which ones are installed:
rvm list
Mine looks like this:

rvm rubies

ruby-1.9.2-p320 [ x86_64 ]
* ruby-1.9.3-p392 [ x86_64 ]
=> ruby-2.2.0 [ x86_64 ]

# => – current
# =* – current && default
# * – default

I’m using 2.2.0. If I wanted to use the version of 1.9.3 I have, I would type
rvm use ruby-1.9.3-p392
Also my default was 1.9.3. If I wanted to change the default to 2.2.0, I would enter
rvm --default use 2.2.0

Upgrading RVM:
Every month or so it’s good to upgrade your rvm. To do so:
rvm get stable

A beginners look at RVM: Installs, Upgrades and the rest

Controller Cheat Sheet

Common in index method

Get all posts and save them to @post, ordered by when they were creating in descending order:

@post = Post.all.order("created_at DESC")

Get all posts by a particular user and save them to @post, ordered by when they were creating in descending order:
@post = current_user.posts("created_at DESC")

Common in new method

Create a new post for the current user when that user has_many posts:

@post = current_user.posts.build

Create a new post for the current user when that user only has_one post:

@post = current_user.build_post

To authorize which users can access what

See my post here.

Controller Cheat Sheet