Editing KDE Desktop Themes

Today, I was looking to rebrand the KDE desktop with my own flair.  I read this very good tutorial at techbase.kde.org.  However, there were a few subtleties that I found it lacking with regard to editing the brand.svg file, as well as any other icon in a theme’s library.

A little background:

Theme data can be found in one of two key directories:

  1. /usr/share/kde4/apps/desktoptheme/
  2. ~/.kde/share/apps/desktoptheme/

There are a couple other files that can be found here and there (for example, Ubuntu declares their own default branding for the Air theme in /usr/share/kubuntu-default-settings/kde4-profile/default/share/apps/desktoptheme/) but most themes reside in one of those two directories above.

To create one’s own theme, I recommend finding something close to what you want to create in KDE’s theme library, then access its files in one of the directories above.  Virtually all of the theme’s graphics are contained in some sort of .svg file.

The tricky stuff:

The particular element that I wanted to edit is the little bit of branding in the upper right-hand corner of the application launcher menu as depicted below.  However this procedure applies to just about all aesthetic edits in the theme. androbit
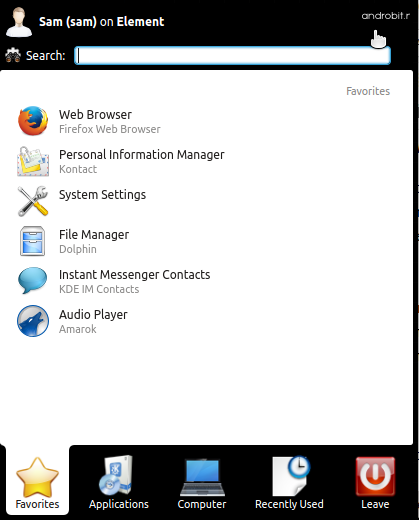
Now the particular theme that I happened to be editing was called “Androbit.”  But this principle should work for all themes (maybe with some minor variation).

  1. To edit the icon, I navigated to the file /home/sam/.local/share/Trash/files/Androbit/widgets/branding.svg.  The file for this in pretty much all themes seems to be branding.svg or branding.svgz.
  2. An svg is a vector image.  The go-to open source tool to edit one of these is Inkscape.  Don’t open it in Gimp or alike because, while gimp can open vector graphics it will save them as bitmaps which is no good for what we’re doing.  So, open it in Inkscape.
  3. Once you’re in inkscape, you’ll need to grab some key info from the existing icon that’s necessary to properly insert your brand object into the theme.
    1. Select the item and right click on it and select “Object Properties”.ObjectProperties
    2. Within the “Object Properties” window, you will find two text strings: “Id” and “Label”.  Write down both strings; you’ll need them in a couple steps.ObjectPropertiesWindow
  4. Now, go ahead and delete the original bit of branding and put your own in its place.YourBranding
  5. Now, to make this text show up, we have to convert it to a path.  This step is a bit odd and I can’t tell if it’s a glitch with Inkscape or if it’s meant to be that way but in either case, here we go.  Note: if it’s just an image that you put in, you won’t need to do this step.
    1. Select the text object you just wrote in.Test
    2. Next, go up to path and select “Object to Path.” ToPath
    3. There, now the text will show up in the theme (only took me a couple hours to figure that out).
  6. Now, remember that text string from step 2?  Good, you’ll need them.  Right click on your new object and select “Object Properties.”  (Just like before)
  7. Then write in the two text strings for “Id” and “Label.”new object properties
  8. Now save the file and that’s it.  Your new branding should be in your application launcher menu.
Editing KDE Desktop Themes

Getting text to show in Inkscape svg

Today I ran into a common problem when editing an svg file that I’d forgotten about since the last time I used inkscape to animate a presentation.  I created a new text element in the program but when I went to embed it, the text didn’t show up.  I tried all sorts of things but then remembered this trick that I learned when working with Sozi, a fantastic little nonlinear presentation editor for Inksape.  Apparently in Inkscape simply writing text with the little text editor isn’t sufficient to get it to render in animations, web browsers and alike.

So what to do?

Inkscape’s text appears just fine but only after it’s been converted to a path.

  1. Select the text object you wish to display.Test
  2. Then go up to path and select “Object to Path.”ToPath
  3. Save the changes and you should be all set.
Getting text to show in Inkscape svg

How to download a file from sourceforge with command line

I often need to download a file from sourceforge to a server or some remote system via command line but I can never remember how. I decided to write it down so I don’t have to keep sifting through AskUbuntu when I need to.

All you need to do is use wget, paste in the link you get from clicking the download button and specify the file name with -O.

So if I wanted to download ClamAV (found here) I’d click on the download link, get the url and filename and paste them in like so.

wget "http://sourceforge.net/projects/clamav/files/latest/download" -O clamav-0.98.tar.gz

That’s all there is to it!

How to download a file from sourceforge with command line

How to check the health of one’s Hard Disk On Ubuntu

So if your hard disk health is of concern, here’s a quick way to figure out if there’s an issue.  I will assume (in this case) that the computer has no operating system, but the utility can be used even if it does.  Below is a step-by-step tutorial on how to test the health of your hard disk using an ubuntu live cd.

Here are the steps:

  1. Boot from your live cd.
  2. Now when you’re at your desktop you’ll want to bring up the terminal (see figure below).  Disk help
  3. Now with your terminal open you’ll need to install the disk utility we’ll be using.  So in the terminal, type:

    sudo apt-get install smartmontools

    smartmontools

  4. It’ll throw up a whole bunch of crazy computer stuff.  It’ll likely ask you if you want to install it (and a whole bunch of other packages) type y and hit enter.  See below:install smartmontools
  5. Very good, now let’s check to make sure your hard drive is coherent and uses S.M.A.R.T..  SMART stands for Self-Monitoring, Analysis and Reporting Technology and basically stores info about your hard drive’s performance.  To make sure your hard drive is using it (it almost certainly is) go ahead and type:

    sudo smartctl -i /dev/sda

    Smart/dev/sda is the path to what is likely your primary hard disk.  This isn’t always the case, especially if you have multiple drives which could be sdb sdc or something else.  For those in that situation, I feel safe assuming that you know which one you’re after.

    1. If it’s available and enabled, you’re good to go.
    2. If it’s available but not enabled type

      sudo smartctl -s on /dev/sda

      and carry on.

    3. If it’s not available and therefore not enabled, this tutorial won’t be of much help to you.
  6. Now, time to test do a long test.  Place the computer somewhere where it won’t be disturbed and type:

    sudo smartctl -t long /dev/sda 

    The result will look something like below, wherein it will give you the amount of time it will take to make it happen.long test

  7. After waiting for the recommended amount of time, come back and type:

    sudo smartctl -l selftest /dev/sda

    and it wil give you the stats on its latest tests.  If those stats are blank, it just needs some more time.

That should give you all the info you need to determine if your drive is toast.

Good luck!

How to check the health of one’s Hard Disk On Ubuntu

Saving Package Markings TERMINAL STYLE!

Alright, so as a KDE user I don’t use synaptic.  Not that I wouldn’t want to it’s just… you know I use KDE so I guess I use…Muon?  Anyway Muon’s much better than the previous KDE software manager yet I still can’t get it to save my markings.  It’s always grayed out on the file menu and I can’t be bothered to figure out why.  SO what to do when I want  a fresh install?

I go command line on it:

dpkg --get-selections > ~/Desktop/packages

It’s consistent, fool proof and works with any distro.  …plus it’s command line and that always makes me feel smart…until I break something…hence the need for reinstalling the operating system.

Saving Package Markings TERMINAL STYLE!

Solution: E: Could not get lock /var/lib/apt/lists/lock – open (11: Resource temporarily unavailable)

So occasionally I’ll end up closing out of an update or something else will happen and then next time I use my package manager, I’ll get an error something like this

E: Could not get lock /var/lib/apt/lists/lock – open (11: Resource temporarily unavailable)

Anyway, I’ve found a quick little trick to help this situation.  Type

sudo dpkg –install

And it usually shakes off the nonsense for me.  Don’t know why, but it does.

Solution: E: Could not get lock /var/lib/apt/lists/lock – open (11: Resource temporarily unavailable)

Manual nvidia drivers install

So I ran into this problem after re-installing Kubuntu 10.04 (for reasons that I shall not go into ::rolls eyes::).  Anyway, having an Nvidia GeForce 8400GS, I figured I could use the standard autodetection that Ubuntu provides for proprietary graphics drivers (described here) but for some reason that was not the case, so I needed to go in manually.

  • First, using the terminal, I installed the latest nvidia drivers

sudo apt-get install nvidia-current

  • Then, I restarted my computer and realized that my resolution was all wonky.  When I went into my “nvidia x server settings,” it told me that no such drivers were enabled.
  • so I followed the directions in the error message and ran the following command:

sudo nvidia-xconfig

  • Then I restarted my x server with the command 

sudo restart kdm

NOTE: the “kdm” is only because I’m running KDE.  If you’re running gnome it’s “gdm” and after 11.10 it’s “lightdm”

  • then everything worked fine!
Manual nvidia drivers install

Hello world!

Welcome to WordPress.com. After you read this, you should delete and write your own post, with a new title above. Or hit Add New on the left (of the admin dashboard) to start a fresh post.

Here are some suggestions for your first post.

  1. You can find new ideas for what to blog about by reading the Daily Post.
  2. Add PressThis to your browser. It creates a new blog post for you about any interesting  page you read on the web.
  3. Make some changes to this page, and then hit preview on the right. You can always preview any post or edit it before you share it to the world.
Hello world!